Intro
Unless you’re a sysadmin or worked with GNU/Linux servers for a long time, it’s very possible that you’ve never heard about a chroot jail. This is a very old topic, seriously, I learned how to create a jail about 15 years ago, yet it remains a very useful concept today.
Let’s say you have your own server, and you decide to mount your own mini-hosting project. Somehow, you need to give your users access via SSH so they can do their stuff. However, it’s really important to control what these users can do on the server. Furthermore, it’s not a good idea for users to see what’s installed on it, gather information about the host system, check the system logs, see what their neighbors are doing, etc.
Many web hosting services don’t even offer shell access, especially when it’s shared hosting. They provide just an FTP/SFTP user and password for uploading the site content. This is a more restrictive approach, but SSH access gives the users more freedom.
The idea behind creating a chroot jail is to give the users access to a completely isolated environment, where they will have very limited actions, and we can control exactly what they need to see and do.
Setting up the jail
This is a step by step guide on how to manually set up a jail. It’s based on my notes, and you can follow these steps on most Debian-based distributions. Just be sure to adjust the necessary paths and values according to your specific setup.
Creating the user
Let’s create the user we want to give restricted access.
~$ useradd -g www-data -d /home/pythonpirate -s /bin/bash pythonpirate
~$ mkdir /home/pythonpirate && cd /home/pythonpirate
Now we have a new user named pythonpirate who will be the user to be jailed. This user belongs to the www-data group. I will assume these values from now on, also that you’re performing these steps as root or have the necessary permissions.
Creating the root directory tree
The following steps will create the root directory tree for the jailed user. In other words, the host directory /home/pythonpirate will be what the jailed user sees as / directory. He won’t be able to see or access directories beyond this point.
~$ mkdir {dev,etc,home,usr,var}
~$ mkdir -p usr/{bin,lib,share}
~$ mkdir -p home/pythonpirate
~$ ln -s usr/bin bin && ln -s usr/lib lib
Setting up the /dev directory
This is probably the most difficult part to explain to GNU/Linux newcomers. As you may know, the /dev directory in a GNU/Linux system is where devices files are stored. These are representations of physical and virtual devices managed by the operating system. The device files in /dev provide an interface to the kernel, allowing user-space programs to interact with hardware and virtual devices.
There are two types of device files:
- Character devices: Represent devices that handle data as streams of bytes (e.g., keyboard, serial ports).
- Block devices: Represent devices that handle data in blocks (e.g., hard drives, usb drives).
Let’s create our jail’s dev files.
~$ mknod -m 666 dev/null c 1 3
~$ mknod -m 666 dev/random c 1 8
~$ mknod -m 666 dev/tty c 5 0
~$ mknod -m 666 dev/urandom c 1 9
~$ mknod -m 666 dev/zero c 1 5
The command mknod is used to create these special block or character device files. The -m flag sets the file permission bits. The c refers to character device. If you’re wondering about the last two integers, those are the major and minor numbers. It’s a low-level representation that specifies to the kernel the driver (major number) and the specific device handled by that driver (minor number).
Setting up the /etc directory
The /etc directory is a crucial part of the filesystem that contains all system-wide configuration files and shell scripts used to manage the system. Here, we’re doing a minimal setup for the jail. Note that some binaries often read configurations located in /etc, so you might need to add more files depending on which binaries you’re making available inside the jail.
~$ cp /etc/bash.bashrc etc/
~$ cp /etc/{localtime,timezone} etc/
~$ cp /etc/nsswitch.conf etc/
~$ cp /etc/profile etc/
~$ cp /etc/shells etc/
For consistency, we also need to copy relevant data from the host regarding to the user and group, we don’t want to copy all data though, just what’s relevant for this user.
~$ cat /etc/passwd | grep root > etc/passwd
~$ cat /etc/passwd | grep www-data >> etc/passwd
~$ cat /etc/passwd | grep pythonpirate >> etc/passwd
~$ cat /etc/shadow | grep pythonpirate >> etc/shadow
~$ cat /etc/group | grep root > etc/group
~$ cat /etc/group | grep www-data >> etc/group
~$ cat /etc/gshadow | grep root > etc/gshadow
~$ cat /etc/gshadow | grep www-data >> etc/gshadow
Installing binaries and shared libraries
We’ve reached the most tedious part; Copy the binaries and the required dependencies for them to run correctly. Sometimes binaries also need to access other parts of the filesystem, as might be the case for files in /etc or /usr/share directories. In most cases, this can be solved by trial and error if errors are descriptive enough, or by doing a quick research.
The first thing our jailed user will need is a shell, of course. The process is the same for almost every binary.
~$ cp /bin/bash bin/
Now let’s get the library dependencies for that binary. Note that the exact lib directory might differ between different processor architectures and operating systems.
~$ ldd /bin/bash
It will show an output like this:
linux-vdso.so.1 (0x0000ffffa74c3000)
libtinfo.so.6 => /lib/aarch64-linux-gnu/libtinfo.so.6 (0x0000ffffa72d0000)
libc.so.6 => /lib/aarch64-linux-gnu/libc.so.6 (0x0000ffffa7120000)
/lib/ld-linux-aarch64.so.1 (0x0000ffffa7486000)
We can ignore the first entry because, as you might infer, it is not a regular shared library file stored on disk. Instead, it’s mapped directly into memory space. For this purpose we only care about files stored in the filesystem.
Let’s copy the rest of the libraries, and we must recreate the original filesystem paths if necessary.
~$ mkdir -p lib/aarch64-linux-gnu
~$ cp /lib/aarch64-linux-gnu/{libtinfo.so.6,libc.so.6} lib/aarch64-linux-gnu/
~$ cp /lib/ld-linux-aarch64.so.1 lib/
Done! We must repeat this step for each binary we want to make available inside the jail. I want the jailed user to be able to run ls, mv, and rsync.
~$ cp /bin/ls bin/
Check ls shared libraries and copy them into the jail.
~$ ldd /bin/ls
linux-vdso.so.1 (0x0000ffff9a50c000)
libselinux.so.1 => /lib/aarch64-linux-gnu/libselinux.so.1 (0x0000ffff9a430000)
libc.so.6 => /lib/aarch64-linux-gnu/libc.so.6 (0x0000ffff9a280000)
/lib/ld-linux-aarch64.so.1 (0x0000ffff9a4cf000)
libpcre2-8.so.0 => /lib/aarch64-linux-gnu/libpcre2-8.so.0 (0x0000ffff9a1d0000)
~$ mkdir -p lib/aarch64-linux-gnu
~$ cp /lib/aarch64-linux-gnu/{libselinux.so.1,libc.so.6,libpcre2-8.so.0} lib/aarch64-linux-gnu/
~$ cp /lib/ld-linux-aarch64.so.1 lib/
You may notice that some directories and libraries were already copied by the previous binary. You don’t need to do this again, but I just want to make the process clear.
~$ cp /bin/mv bin/
~$ ldd /bin/mv
linux-vdso.so.1 (0x0000ffffa3070000)
libselinux.so.1 => /lib/aarch64-linux-gnu/libselinux.so.1 (0x0000ffffa2fb0000)
libacl.so.1 => /lib/aarch64-linux-gnu/libacl.so.1 (0x0000ffffa2f80000)
libattr.so.1 => /lib/aarch64-linux-gnu/libattr.so.1 (0x0000ffffa2f50000)
libc.so.6 => /lib/aarch64-linux-gnu/libc.so.6 (0x0000ffffa2da0000)
/lib/ld-linux-aarch64.so.1 (0x0000ffffa3033000)
libpcre2-8.so.0 => /lib/aarch64-linux-gnu/libpcre2-8.so.0 (0x0000ffffa2cf0000)
~$ mkdir -p lib/aarch64-linux-gnu
~$ cp /lib/aarch64-linux-gnu/{libselinux.so.1,libacl.so.1,libattr.so.1,libc.so.6,libpcre2-8.so.0} lib/aarch64-linux-gnu/
~$ cp /lib/ld-linux-aarch64.so.1 lib/
And now rsync.
~$ cp /bin/rsync bin/
~$ ldd /bin/rsync
linux-vdso.so.1 (0x0000ffff81478000)
libacl.so.1 => /lib/aarch64-linux-gnu/libacl.so.1 (0x0000ffff81360000)
libz.so.1 => /lib/aarch64-linux-gnu/libz.so.1 (0x0000ffff81320000)
libpopt.so.0 => /lib/aarch64-linux-gnu/libpopt.so.0 (0x0000ffff812f0000)
liblz4.so.1 => /lib/aarch64-linux-gnu/liblz4.so.1 (0x0000ffff812a0000)
libzstd.so.1 => /lib/aarch64-linux-gnu/libzstd.so.1 (0x0000ffff811e0000)
libxxhash.so.0 => /lib/aarch64-linux-gnu/libxxhash.so.0 (0x0000ffff811c0000)
libcrypto.so.3 => /lib/aarch64-linux-gnu/libcrypto.so.3 (0x0000ffff80d60000)
libc.so.6 => /lib/aarch64-linux-gnu/libc.so.6 (0x0000ffff80bb0000)
/lib/ld-linux-aarch64.so.1 (0x0000ffff8143b000)
~$ mkdir -p lib/aarch64-linux-gnu
~$ cp /lib/aarch64-linux-gnu/{libacl.so.1,libz.so.1,libpopt.so.0,liblz4.so.1,libzstd.so.1,libxxhash.so.0,libcrypto.so.3,libc.so.6} lib/aarch64-linux-gnu/
~$ cp /lib/ld-linux-aarch64.so.1 lib/
The following binaries use libraries we already copied in these three commands, I think the process is clear now, so I will save coping the libraries again.
cp /bin/{cat,chgrp,chmod,clear,cp,date,dircolors,env,grep,groups,head,id,less,mkdir,more,rm,rmdir,tail,touch,whoami} bin/
Additionally, the clear command has more dependencies besides shared libraries, so we have to make them available inside the jail too.
~$ cp -r /usr/share/terminfo usr/share/
~$ cp -r /usr/lib/terminfo usr/lib/
Final tuning
Let’s give our jailed user a colored shell by default.
~$ echo "export LS_OPTIONS='--color=auto'" > home/pythonpirate/.profile
~$ echo 'eval "$(dircolors)"' >> home/pythonpirate/.profile
~$ echo "alias ls='ls \$LS_OPTIONS'" >> home/pythonpirate/.profile
Fix ownership so he can write in his jailed home without problem.
~$ chown -R pythonpirate:www-data home/pythonpirate
Finally, don’t forget to assign a password to the user.
~$ passwd pythonpirate
Configuring the ssh service
We are almost set, next step is to tell sshd service that certain kind of users will chroot to a certain directory. Create a file on /etc/ssh/sshd_config.d/10-ssh-jail.conf and add the following content.
Match Group www-data
    AllowAgentForwarding no
    AllowTcpForwarding no
    ChrootDirectory /home/%u
    X11Forwarding no
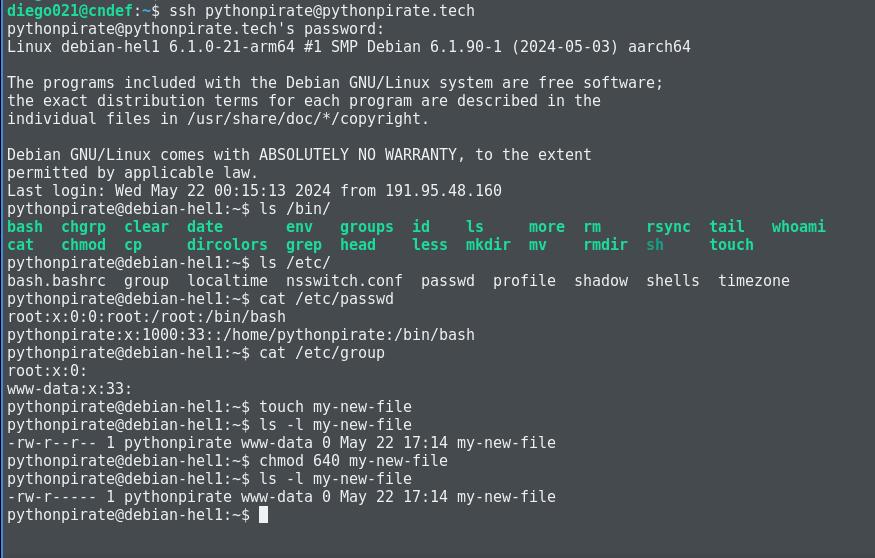
All users belonging to www-data will chroot to their home directory. By restarting sshd service, you can start testing the jail!
~$ systemctl restart sshd
Mounting bind directories
The idea behind all of this, in this specific scenario, is that restricted users can manage their sites in a completely isolated environment. This means users should be able to upload their files, change them, or even have access to some logs.
For this, we have to do a bind mount. This technique provides us exactly what we need; to mount a host system directory into another directory. This means both directories will point to the same physical location. They are the exact same directory accessible from both parts of the filesystem, so we don’t have to copy or sync anything because it will be synced by nature.
~$ mkdir var/{log,www}
I will make available both the files and the logs that the pythonpirate user needs to see available inside the jail; they will point to /var/log and /var/www within jailed user environment.
Be sure that in your web server configuration, data and logs are split by host, we don’t want one user to see the logs of other users, for example.
~$ mount --bind /var/www/pythonpirate /home/pythonpirate/var/www
~$ mount --bind /var/log/lighttpd/pythonpirate /home/pythonpirate/var/log
To make it permanent, we need to add these entries into the host /etc/fstab file, otherwise, we will lose the mount on each reboot.
~$ echo "/var/www/pythonpirate /home/pythonpirate/var/www none bind 0 0" >> /etc/fstab
~$ echo "/var/log/lighttpd/pythonpirate /home/pythonpirate/var/log none bind 0 0" >> /etc/fstab
Finally, let’s check the jail.
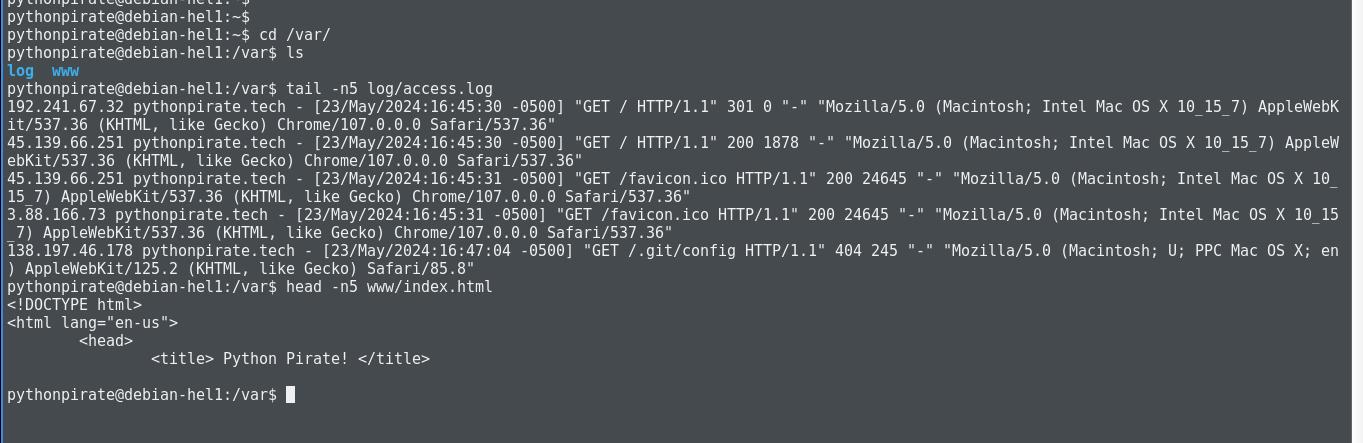
Bind mounted directories inside jail, mission accomplished!
What’s next
If you’ve reached this far, you must have noticed that all this manual job can be overwhelming if we do it step by step for each user. I will be working on a script to automate all of this, hope to have it soon.
I didn’t figure out yet how can a jailed user change his password. So far, it’s impossible, the root must set a password for the user. This is not a problem if users are using key based authentication.